Origami (or paper folding) is a decorative art form, primarily rooted in ancient Japanese culture. In addition to being a sophisticated and complex art form, origami provides solutions to many problems in modern science and engineering. For example, origami-inspired techniques are used to design stents that fold up very small and then unfold to open clogged arteries, to fold airbags that release effectively during automobile collisions, and even to unfurl the large sunshade for the James Webb Space Telescope (JWST).
 Watch video
An airbag is a ubiquitous piece of equipment in most cars these days. But if you think about how they have to work, airbags have to open very quickly and become sturdy enough to protect the passenger. What's the best way to do that? Create a 3-D polyhedron from a flat sheet with folds.
 Watch video
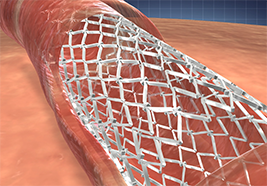
In medicine, origami techniques are often applied via stents, which are collapsible tubes that can be inserted into a patient’s veins or arteries to a site of a clot. When deployed, the stent, which can be made of bioplastics or other similar materials, expands to open the vein or artery to critically improve blood flow.
 Watch video
NASA's James Webb Telescope (JWST) is a large space-based telescope that observes infrared light from the Universe. The biggest feature of the JWST is a tennis court sized shade, or sunshield, that protects the telescope from light and heat. JWST’s sunshield was designed to be folded twelve times in order to fit inside the rocket that boosted it into outer space..
* SAO does not endorse any products/companies
In astrophysics, there are instances where the expansion and unpacking of origami demonstrates similarities to what scientists witness, for example the death of stars. When a star about 10 to 15 times more massive than our Sun runs out of nuclear fuel, it will collapse onto itself and then create a giant explosion. This energetic event, known as a supernova, hurls the outer layers of the star into space, creating an elegant tapestry of energy and stellar debris. NASA’s Chandra X-ray Observatory, as well as other telescopes, have looked at many of these explosions and the debris fields they leave behind (called “supernova remnants”).
In this project, we will explore how origami can help us understand how objects can fold up to take up a very small space and unfold to be very large. Using spacecraft design as the main inspiration, we will create mini-solar arrays, a simple folding space telescope, and a mini-sunshade.
These projects are designed to be successful with children and novice folders. No project will be ruined by inaccurate folding. Precision may improve the look of these models, but they will all function well without a high degree of precision. Precision comes with practice.
Objective:
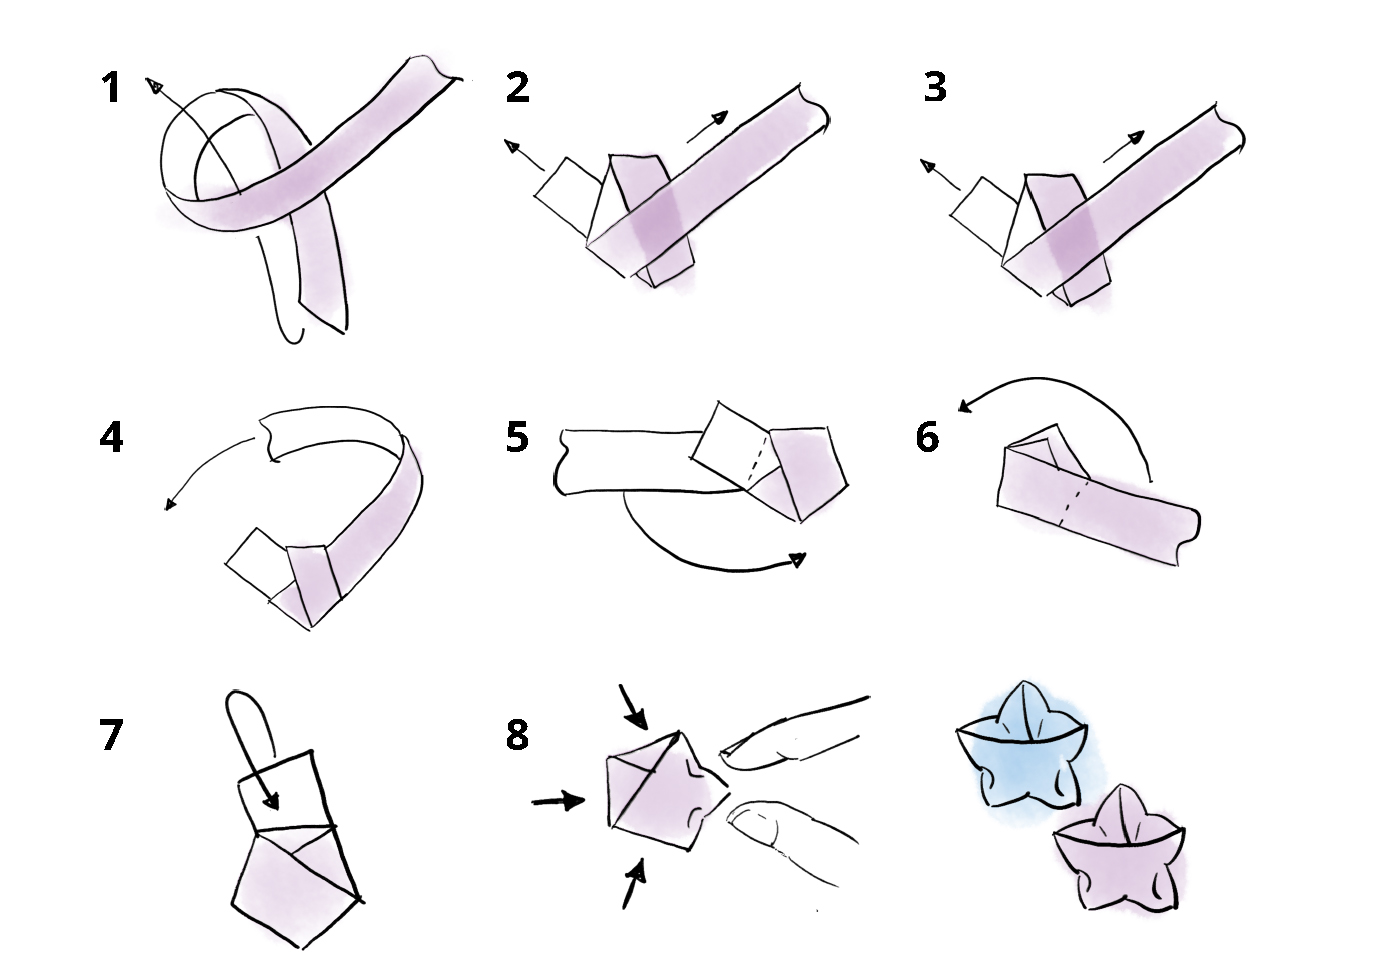
Warm up to basic origami by folding a tiny star with thin strips of paper. Unfold the star to investigate how a supernova unpacks the star’s material.
Materials:
1 long/thin strip of origami paper. These origami lucky stars are made with strips of paper cut about 10-inches to 11-inches long. Each strip can be as wide as 1/4 inch, 1/2 inch, or 3/4 inch. Thinner strips make smaller stars while fatter strips make larger stars. Copy paper can be substituted if necessary. For younger folders, long, wider strips of birthday/holiday wrapping paper can be used to make larger stars.
Ages: any
Time needed: 15-20 minutes
Helpful Hint: Be very careful when folding and knotting your paper to avoid ripping it.
Background: Supernovas
Every 50 years or so, a massive star in our galaxy blows itself apart in a supernova explosion. When stars explode, they essentially "unpack" themselves and the remains of the star are flung out into the Universe. Supernovas are one of the most violent events in the cosmos, and the force of the explosion generates a blinding flash of radiation, as well as shock waves analogous to sonic booms.
Process:
1. Make a loop at one end of the paper. Weave the short end of the paper through the loop.
2. Tighten knot and press flat.
3. Fold short-end of paper down towards center of star. If it is too long, tear off a small piece.
4. Fold long-end of paper up. Make sure edges line up right on top of one another.
5. Flip paper around so long-end of paper is pointing down again.
6. Fold long-end of paper up and to the left. Make sure edges line up one on top of the other.
7. Flip paper around again so long-end of paper is pointing down.
8. Pinch the sides and puff out your star! Be careful here, too, to avoid ripping your star.
Objective:
Introduce the idea that taking anything into space requires that it take up a minimum amount of space. There are often objects that are very large in their open state. Think of telescopes, solar arrays, surface rovers (e.g., Mars Curiosity Rover), etc.
Introduce the idea that folding is a solution for this problem. Folding is a technique that purposefully minimizes the space that an item takes, but allows for efficiently unfolding the item into its useable state without damage to the item.
Using ordinary paper, such as copy paper, students will experiment with ways to compress paper into the smallest area and/or volume. While keeping a free-form and experimental frame of mind, students will be encouraged to try a variety of techniques, which might include folding or crumpling the paper followed by observations of the effectiveness of each method.
Materials:
• 2 sheets of rectangular (or square) paper of the same size for each student
• If time permits, you can have an extra 2 sheets of paper that are lighter or heavier than the original sheets.
Ages: any
Time needed: 20-30 minutes
Process:
Working in small groups (2-3 students), each student will take the 1 of the sheets of paper and crumple one sheet as small as you can get it.
Each student will fold the other sheet to take up as small an area as you can get it, while making it as flat as possible.
Try different ways of crumpling and folding to see if the method makes a difference and compare results.
Try to estimate the “amount of space” taken up by (or volume of) each of these compacted sheets.
If supplies are available, do the same experiment with lighter (or heavier) weight paper. Compare results.
Thought Questions:
• Why does folded paper take up less space than crumpled paper?
• Does this advantage become greater or less depending on the thickness of the paper?
• Is there ever any advantage to crumpling paper instead of folding it?
• If you flatten out the crumpled paper, can you notice any pattern in the creases?
Objective:
Show that a simple model that can be folded by a novice folder gives a process for significant compression.
Teach students a method for compact folding. This is a simple four-step origami model that is effective in greatly reducing the area and/or volume of the folding medium. It follows on the conclusions from the introductory exercises about the compact-ability of paper through folding.
Show the relationship between this corrugation and items used in space, such as a solar array. Also, there are similar, but more complex folding methods, such as the Miura-ori folding process.
Materials:
• One piece of copy paper (or something similar) for each student. The paper can be any shape rectangle, including square, but needs to be the same size.
• If old calendar pages are available, they make an interesting look that could be folded for a second model
Ages: 10 and up
Time needed: 1 hour
Background: Spacecraft
A solar array is a group of solar panels that captures energy from our Sun to generate electricity as a system. Many spacecraft have solar panels to convert sunlight into the electrical power to help run the spacecraft. Solar arrays have a lot of surface area in which to be pointed towards the Sun to gather all the energy needed. NASA’s Chandra X-ray Observatory, for example, travels about a third of the way to the moon at its farthest point from Earth, in order to observe the X-ray Universe. Chandra generates the electrical power needed to function from its solar arrays. The power is then stored in three banks of batteries, and distributed in a carefully regulated manner to its parts. Chandra’s two 3-panel solar arrays produce about two kilowatts of power (roughly the same power as a hair dryer!) for the heaters, science instruments, computers, transmitters, etc. on board.
Chandra’s arrays were unfolded like an accordion. With its solar arrays deployed, Chandra measures 19.5 meters (64 ft) wide. It’s about as long as a school bus, and was the largest spacecraft to ever fit inside the bay of the Space Shuttle. In order to fit inside the Shuttle, Chandra’s solar panels had to be folded up, and then unfolded after it was deployed and made its way to its orbit.
Researchers from NASA’s Jet Propulsion Laboratory (JPL) have also been designing ways to fold up solar panels into more efficient origami-like packages. As larger solar panels are needed for newer kinds of spacecraft, accordion-style deployment can become riskier, and more liable to fail with each layer of expansion. Creating an origami-packaged solar panel system requires innovation in both the solar array materials and its “packaging,” as solar panels can’t be made paper thin. As you’ll see in the activity below, each fold or bend increases the overall thickness of the object you’re making. Engineers have to take such increases into account when creating solar arrays or other expandable parts of a spacecraft.
The following activity will use a corrugation style of folding to create a mini-solar array.
Process:
This model can be folded from any rectangle, including a square. The fan folds can be creased in either direction, short or long (not both).
1. Make creases horizontal to the edge of the paper, dividing the rectangle into eight equal sections. There are many ways to accomplish this goal. One way would be to fold the paper in half & unfold. Fold each of the halves in half. Fold the entire strip in half again, making eight equal sections. Unfold.
2. Fanfold the rectangle, that is, make sure that the creases made above alternate between mountain and valley folds, reversing folds where necessary. Make creases very firm.
3. Place the folded strip horizontally with the raw edge of the top layer facing away from you.
4. Fold up the bottom left corner to lie on the top edge, pivoting at the top right corner. Make sure the crease goes exactly to the top right corner. You should see an isosceles right triangle. Crease as well as possible, given the thickness of the strip.
5. Bring the left, unfolded, portion of the strip down along the edge of triangle folded in the previous step. Now the unfolded portion of the strip will be vertical.
6. Turn the strip over, which will reorient the unfolded portion of the strip to be horizontal.
7. Repeat the previous 3 steps until the end of the strip is reached, trying to keep the strip from spreading apart as much as possible.
8. Open back to the full rectangle. Orient the first row of V’s into mountain folds with short vertical folds inside the V’s oriented as valley folds. The rest of the paper remains fan folded and the whole sheet can be collapsed with the V’s folded within. Note that there will be a mountain fold coming from the bottom of each V to the bottom of the paper and alternating with valley folds.
9. Open the rectangle most of the way without flattening it completely. Make sure that the first row of Vs stay creased into the mountain orientation. Turn the rectangle over to the back. The V mountain folds will now be valley folds.
10. Now make the second row of V’s into a series of mountain folds. You will also need to reverse each of the fan folds below the V’s. It might actually work better to reverse the fan folds first up to the row of V’s being worked on, and then encourage the V’s into mountain folds.
11. Continue the process of turning the rectangle over, reversing the fan folds below the V’s and creasing in a row of mountain folded V’s.
12. Refer to the “Chevron Corrugation All Creases” diagram sheet for guidance about the mountain or valley orientation of the folds.
13. When you are finished, you should be able to collapse the rectangle back into a strip with all of the V’s sandwiched in between the fan folds.
Thought Questions:
• What is different about the corrugation folding process/result than just fan folding the paper? Is it more effective (i.e., does corrugating decrease the “footprint” of the paper more than just fan folding it)? If so, in what way?
• Can you think of other ways of pleat folding/corrugating paper that would produce a significantly different result?
• Art Connection: Color the model with two colors so that you see only one color when looking at it from the left, and only the other color when looking at it from the right. Can you color it in other interesting ways?
Vocabulary
In origami, a corrugation is a style of design that showcases the entire surface of the paper such that every fold is visible.
Objective:
Explore a more complex folding pattern that affords more compression of the paper than a corrugation.
Gain insight into the unfurling method used in some folding space telescopes and sunshades.
Think about how applications are used to move from a paper model to the engineering of a space telescope that is constructed with rigid materials that are unlike paper, very large, and require a great deal of precision.
Materials:
• One piece of kami origami* paper between 10 and 12 inches square for each student.
• Note that the thinness of origami paper is an important factor in the success of completing this project. Copy paper is too thick. Lighter weight letter paper can be used, but it needs to be strong enough not to rip when folded back and forth multiple times.
Ages: high school
Time needed: at least 1 hour
Background: Making a Spacecraft
Whether you need a satellite to study what’s happening here on Earth, to make images of comets in our Solar System, to learn about our Sun, or to study the history of the Universe itself, each spacecraft requires a few basic components. For example:
• Spacecraft System/Container: A satellite needs a type of container to hold the electronics and devices, and to keep its instruments safe.
• Power Source: A spacecraft needs electricity to run its high-tech instruments. Solar panels and/or batteries are common options.
• Scientific Instruments: Instruments will be used to obtain data of distant galaxies or planets, measure chemicals in the Earth’s atmosphere, monitor the Sun’s activity, and more.
• Communication Device: Spacecraft need some way to communicate with us back on Earth, such as through antennas (shaped like dishes, poles or rods).
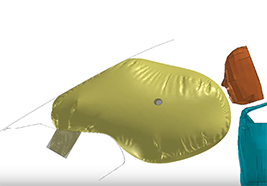
• Orientation Finder: A satellite needs to know where it’s pointed and which way is ‘up,’ through something that looks at the stars (a star tracker) or the sun (a sun tracker). Launching very large telescopes can take a long time to develop, test, and send up to space. Researchers are trying to build and make use of lighter, more compact spacecraft components that can help satellites fold up into smaller launch vehicles to be deployed and unfurled in space. One example of potential compactibility is a solar sail, which can propel a spacecraft through space. A nonprofit group, the Planetary Society, recently launched a solar sail, the LightSail, to test such unfurling capabilities. When sunlight bounces off the reflective surface of the sails, the spacecraft gets a small push. It’s possible that future spacecraft using solar sails could travel to the moon, asteroids or beyond, without as much need for expensive rocket fuel that takes up a lot of room. The LightSail was designed to result in a package smaller than a loaf of bread. Folded tightly up are four sails of Mylar, the same material some balloons are made of. When unfolded, the sail ends up a bit larger than an average sized living room. The following activity will use a flasher style of folding to create a mini-space telescope.
Process:
You will need a square piece of paper for this model. The best paper is something lighter weight than copy paper, around 8”-10” square. Something like origami folding paper works well. For practice, copy paper is fine, the lighter weight, the better.
1. Fold the paper into eight equal sections in both the horizontal and vertical directions.
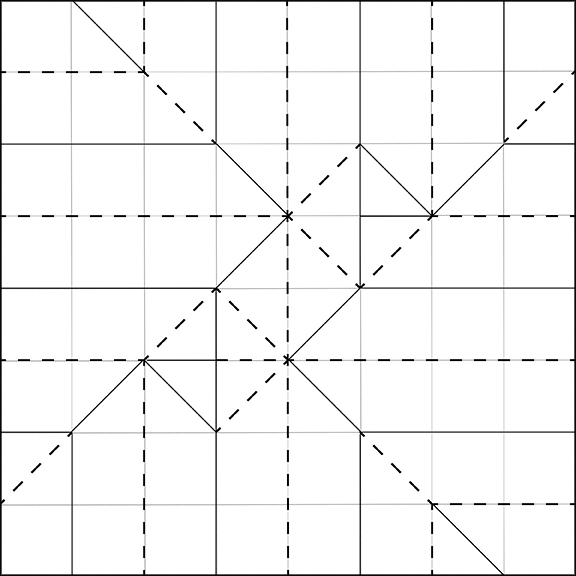
2. Refer to the “Hyperbolic Paraboloid” diagram sheet for guidance about the mountain or valley orientation of the folds. Reorient the grid folds so that they follow the mountain/valley pattern shown on the diagram.
3. Collapse the model around a central core with paper wrapping around. Your model with become three-dimensional. Refer to the instructional video for help with this process.
4. To operate the flasher, grab opposite single layer corners when model is in the closed position. Pull the model open (not all the way flat), then push back into closed position. As the model is opened and closed, it will develop “paper memory” and become easier to operate.
Thought Questions:
• If you folded the Chevron Corrugation, how does the Flasher compare in effectiveness of reducing the footprint of the original paper?
• How do you think an actual space telescope would be made with rigid materials (that don’t fold) and using the Flasher folding process?
•How big would the paper have to be to make a model of an actual space telescope?
• Art Connection: Can you color this model in an interesting way? What aspects of the crease pattern can you use to enhance different aspects of the model?
Vocabulary
A flasher is an ideal, infinite origami pattern that shrinks to a finite size when folded.
*Kami is simply the word for paper in Japanese, but in the last fifteen years or so it has come to mean ‘ordinary’ origami paper, the type that can be bought pre-cut in squares.
Objective:
Learn to fold a model with a different way of compressing paper than the objects in the first two exercises. This object has the characteristic of compressing down to a much smaller area than the original square of paper used, but this model does not fold flat.
Experience the mechanical action of a model that seems to automatically arrange itself into the final desired position.
Make a model that has the look and action of the sunshade on the James Webb Space Telescope.
Materials:
• One square of paper. A square made from copy paper works well. Very thin paper does not work particularly well. The paper should have a bit of “body.”
Ages: 10 and up
Time needed: 30 minutes
Background: Spacecraft
In spacecraft like NASA’s Chandra X-ray Observatory, sunshades are some of the most important elements of the spacecraft system. For a telescope like Chandra, whose “eyes” are too sensitive for the bright light from our nearest star, blocking the light from the Sun is critical to keep it working properly. Located at the front of the spacecraft where radiation enters the telescope, Chandra’s sunshade door remained closed until Chandra achieved pointing control in orbit. Once opened, it shadows the entrance of the telescope to allow it to point as close as 45 degrees to the Sun. The Hubble Space Telescope also has a sunshade door, an aperture door, which not only prevents sunlight from shining down the telescope barrel, but also kept Hubble safe during servicing missions to upgrade the instruments.
However, the sunshade on NASA’s James Webb Space Telescope (JWST) is on another level. JWST is a large space-based telescope that observes infrared light from the Universe. It studies the history of our Universe, from the first glow after the Big Bang, to the formation of solar systems capable of supporting life on planets like Earth, to the evolution of our own Solar System.
A number of innovative technologies have been developed for JWST’s spacecraft. These include a primary mirror made of 18 separate segments that unfolded and adjusted to shape after launch to be about 6.5 m (21.3 ft). The mirrors are made of ultra-lightweight beryllium. But the biggest feature of the JWST is a tennis court sized five-layer shade, or sunshield, (21.197 m x 14.162 m (69.5 ft x 46.5 ft) that attenuates heat from the Sun more than a million times. JWST’s sunshield was designed to be folded twelve times in order to fit inside the rocket that boosted it into outer space (4.57 m × 16.19 m).
Process:
You will need a square piece of paper for this model. It is fine to make a square from a piece of copy or letter paper.
1. Fold both diagonals into the square.
2. Make folds horizontal to the edge of the paper so that each of the 4 sections is folded into 8 equal parts. Do not fold beyond the diagonals.
3. Reorient the folds so that they alternate between mountains and valleys, in other words, fan fold the creases in each section. Make sure that mountain folds meet other mountain folds at the diagonals, and the same for the valley folds.
4. Refer to the “Hyperbolic Paraboloid” diagram sheet for guidance about the orientation, mountain or valley, of the folds.
5. Gently push in on the 4 sections of fan folds until they collapse flat along the diagonals and into the middle of the square. 2 diagonals will want to point down and the other 2 will want to point up. The model will fold fairly flat, but it will not fold totally flat in the middle.
6. Spread the paper out part way until a saddle shape is formed with 1 set of opposite corners pointing up and the other set of opposite corners pointing down. The fan folds will be partially open and form a “wavy” surface.
A second diagram is provided showing each section divided in 16 equal parts for a more curved, refined look if desired.


Thought Questions:
• Can you observe why this model does not fold flat? What is getting in the way of flat folding?
• If you were to make a box to hold this model, what would the dimensions need to be?
• Can you make something similar to this model from paper that has more sides than a square? For instance, a pentagon? Hexagon? Which polygons work and which do not?
• Art Connection: Can you make an interesting coloring of this model using some of the features of the crease pattern?
Side bar
A hyperbolic paraboloid is an infinite surface in three dimensions with hyperbolic and parabolic cross-sections.
NOT ORIGAMI!
For satellites or spacecraft that approach our Sun, a sunshade is typically referred to as a heatshield. NASA’s Parker Solar, launched 2018, for example, has gotten closer to the Sun than any human-made object ever has before. Temperatures on the heat shield reach almost 2,500 degrees Fahrenheit, though the spacecraft will be at only 85 degrees Fahrenheit. The heat shield is true thermal protection system. Weighing about 160 pounds, the shield is eight-feet in diameter, can be used to defend the spacecraft against the intense heat and energy of our star. The Sun-facing side of the heat shield is sprayed with a special white coating to reflect as much of the Sun’s energy away from the spacecraft as possible.

Download all the activities in one PDF.
Watch expert Robert Lang, physicist and origami artist, discuss "The Math and Magic of Origami" in a TED talk
Visit OrigamiUSA, a society devoted to origami, the art of paperfolding.
Learn about the James Webb Space Telescope.
James Webb Space Telescope Features: Webb and Origami.
Related articles on origami and science:
From Heart Stents to Airbags.
Origami Science: Bendable Electronics & more.
Nine Origami Applications.